Apple has made several improvements to the Mail app in macOS Ventura, adding some much requested featured and tweaking some long-time features. My favorite new features are the ability to schedule when an mail is sent and the ability to undo the sending of an email.
How to schedule when an email is sent
° Launch Mail and compose an email as you normally would.
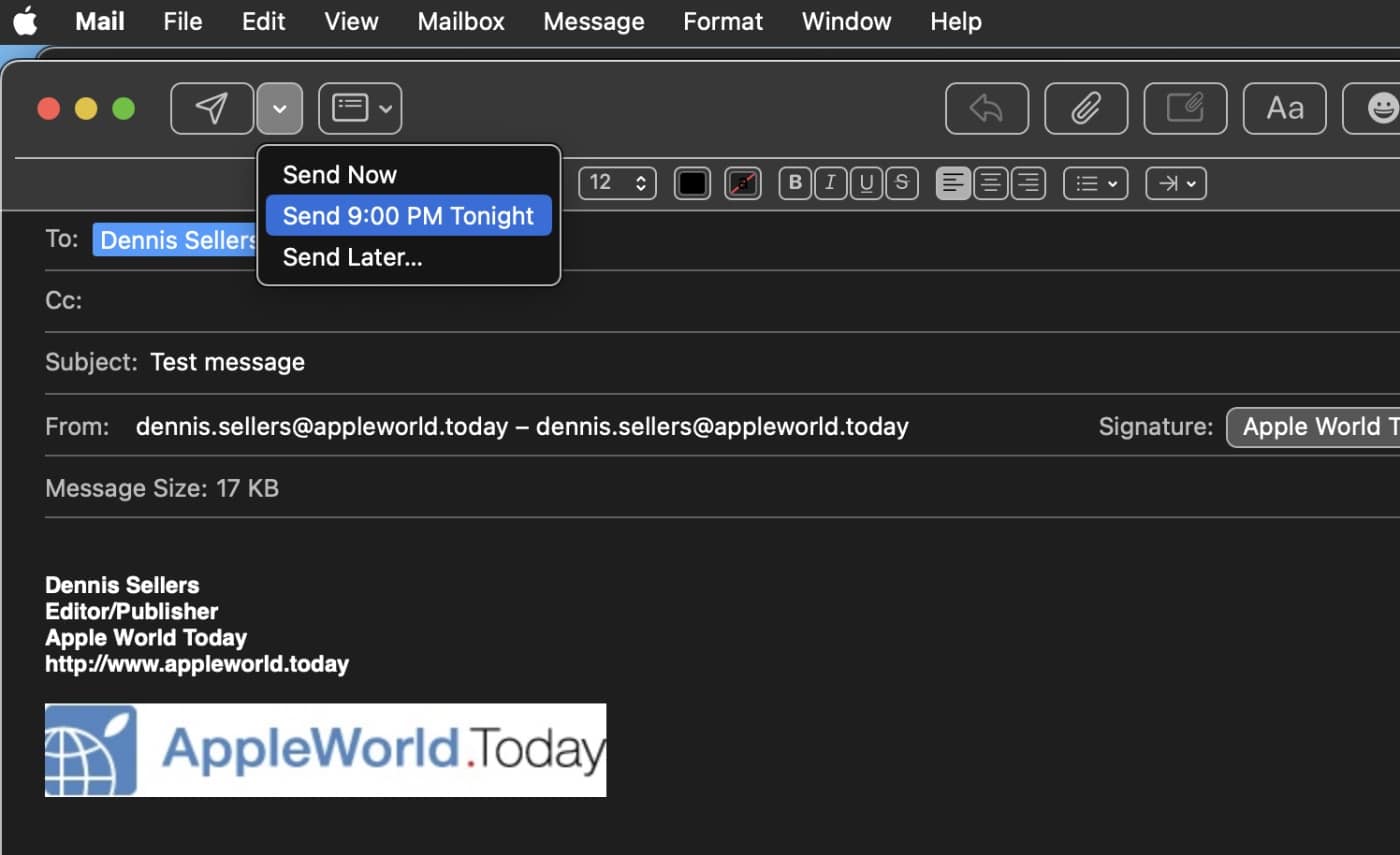
° Click on the side of the Send button and a dropdown menu will appear.
° Select one of the suggested times, or click Send Later.
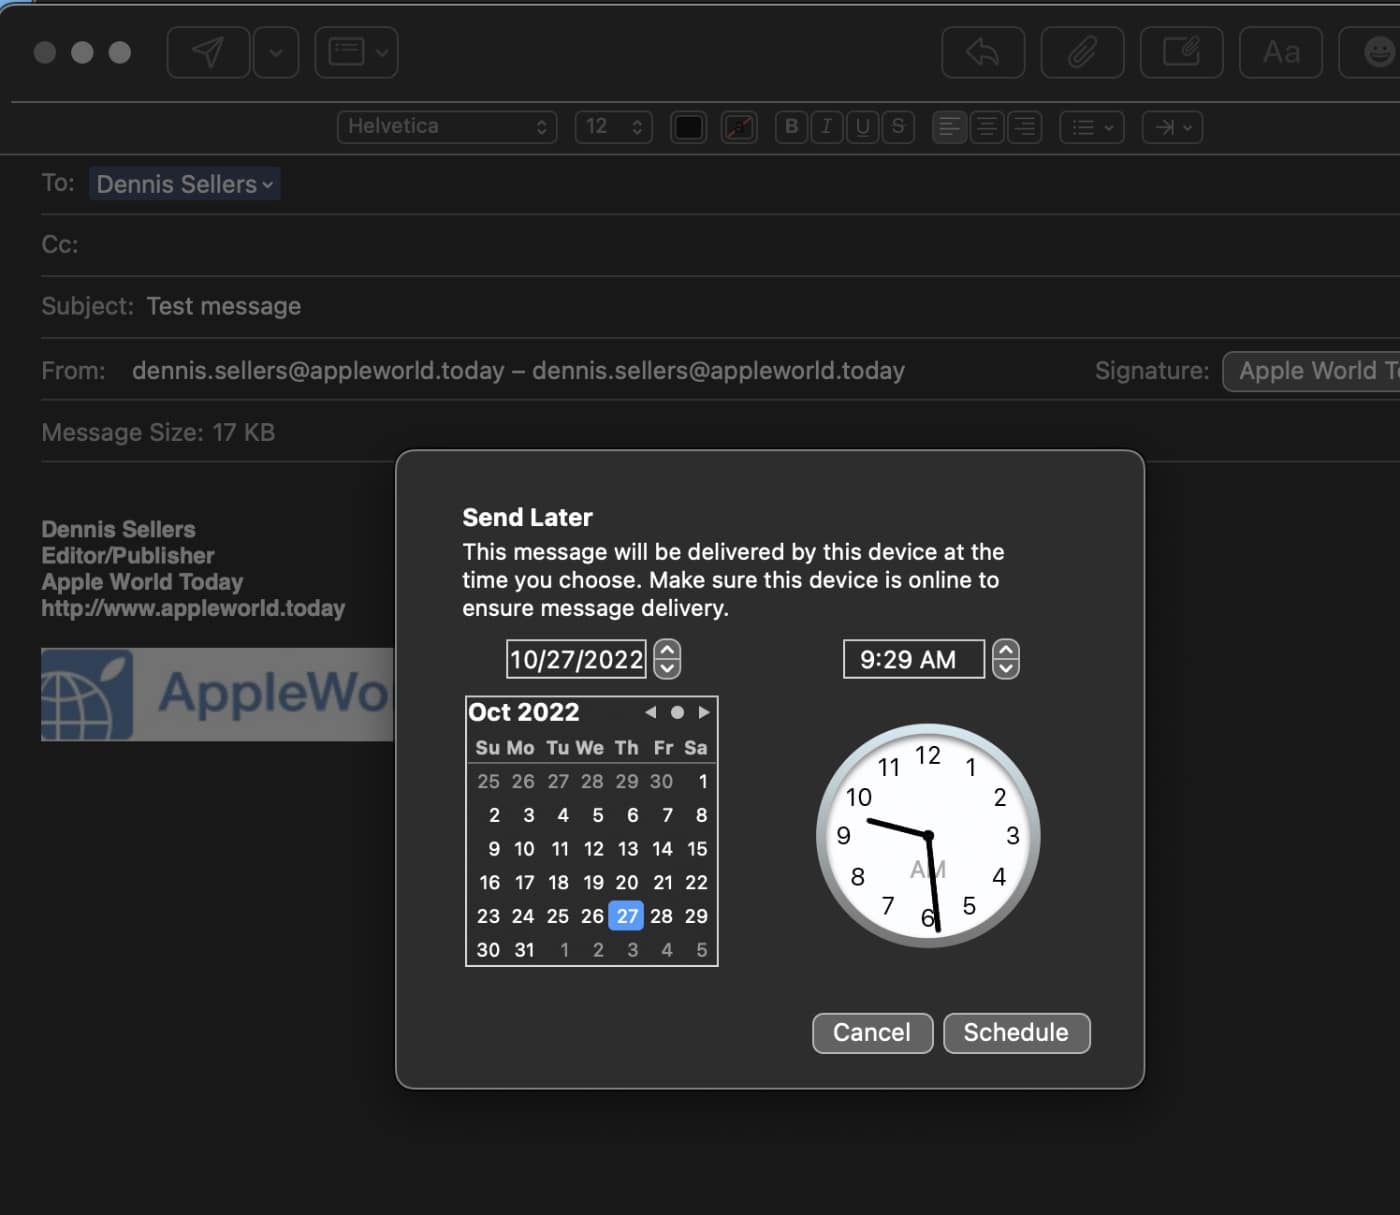
° Use the date and time picker to schedule your email.
° Click on Schedule.
° A new mailbox called Send Later will appear with your message and its scheduled send time displayed. It will be sent at that time — unless you turn off your Mac.
If you need to reschedule when an email is sent:
° Launch Mail and open the Send Later mailbox.
° Double-click the message. You’ll see the time that the message is scheduled to send.
° Click on Edit and choose a new time.
How to undo a sent message
macOS Ventura Mail lets you easily unsend an email message that you just sent before it reaches the recipient’s inbox. )“Just sent” means you have 10 seconds to undo a sent email.) To do this:
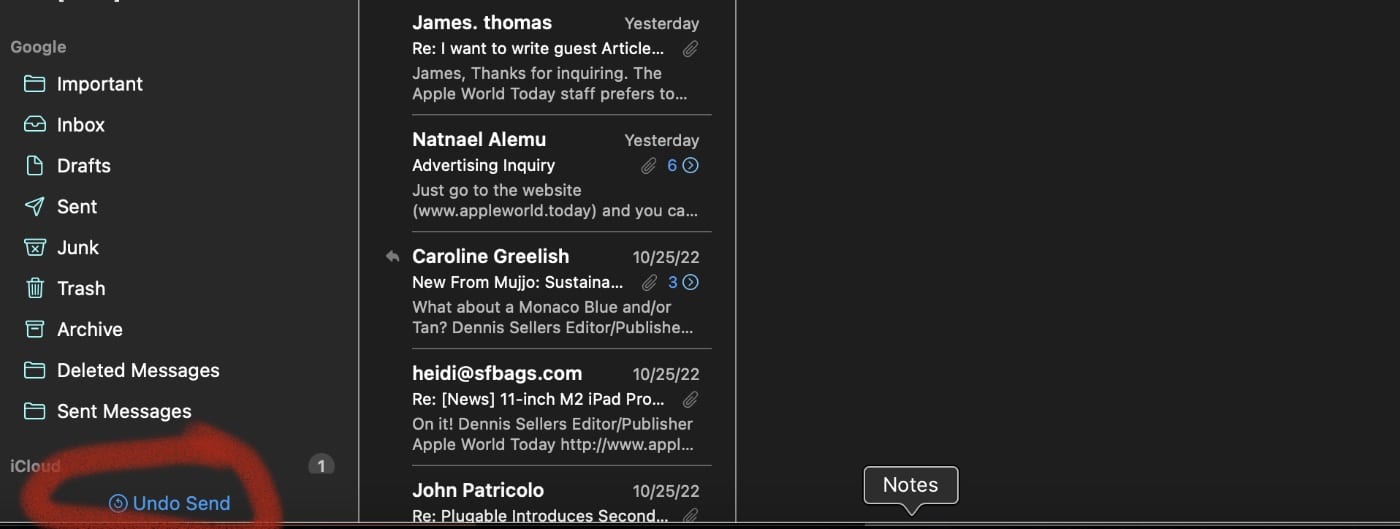
° Launch Mail and open the Sidebar. If you don’t see the Sidebar, go to View and enable Show Sidebar.
° After you send an email, an Undo Send link appears at the bottom of the Sidebar. As mentioned, you have 10 seconds to unsend your email. When time expires if you don’t click it, the link flashes into a “Sending mail” alerts and the email is sent.
How to use Remind me
With the revamped Mail, you can select a date and time to be reminded to have messages resurface in your inbox. To do this:
° Select an email and right-click (command/click) on it.
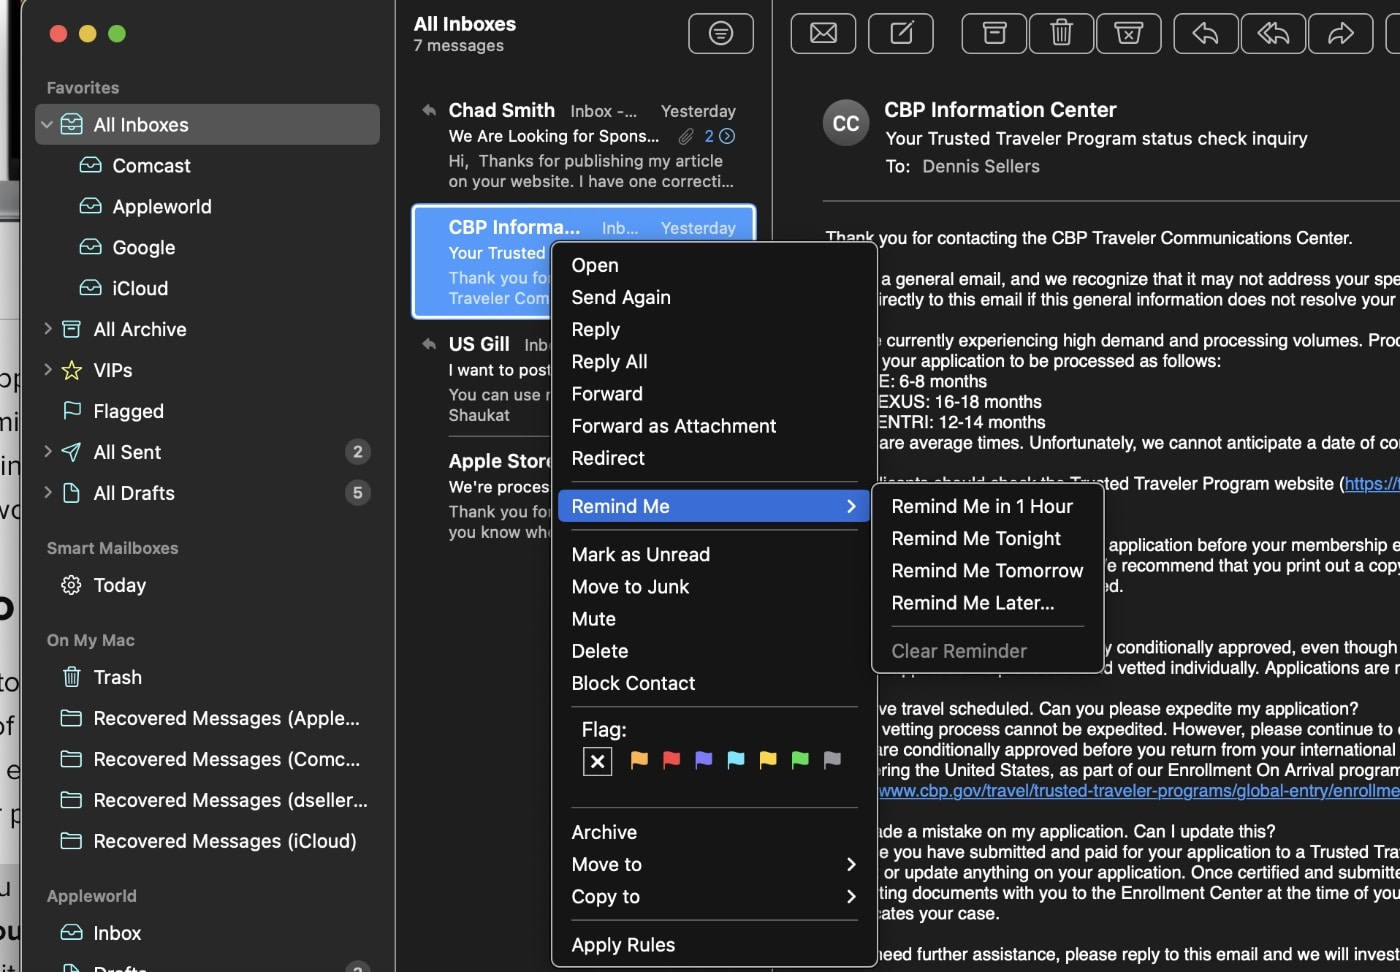
° Click the Remind Me menu, and select one of the following options: Remind me in 1 hour, Tonight, Tomorrow or Remind Me Later. The last option lets you choose a specific time and day for the reminder.
When the timer expires, the Mail app will alert you to check the message. Mails that have been marked by the feature have a “Remind Me” tag. There’s also a Remind Me tab on the sidebar for quickly viewing emails with the “Remind Me” tag.
Rich links in Mail
With macOS Ventura Mail, you can add rich links that give your email messages more context and details at a glance. Rich Links displays a thumbnail preview of a web page’s contents. To use Rich Links:
° Launch the Mail app and compose an email.
° Go to the URL or link of the website you want to send and copy it.
° Paste the link into the mail composer.
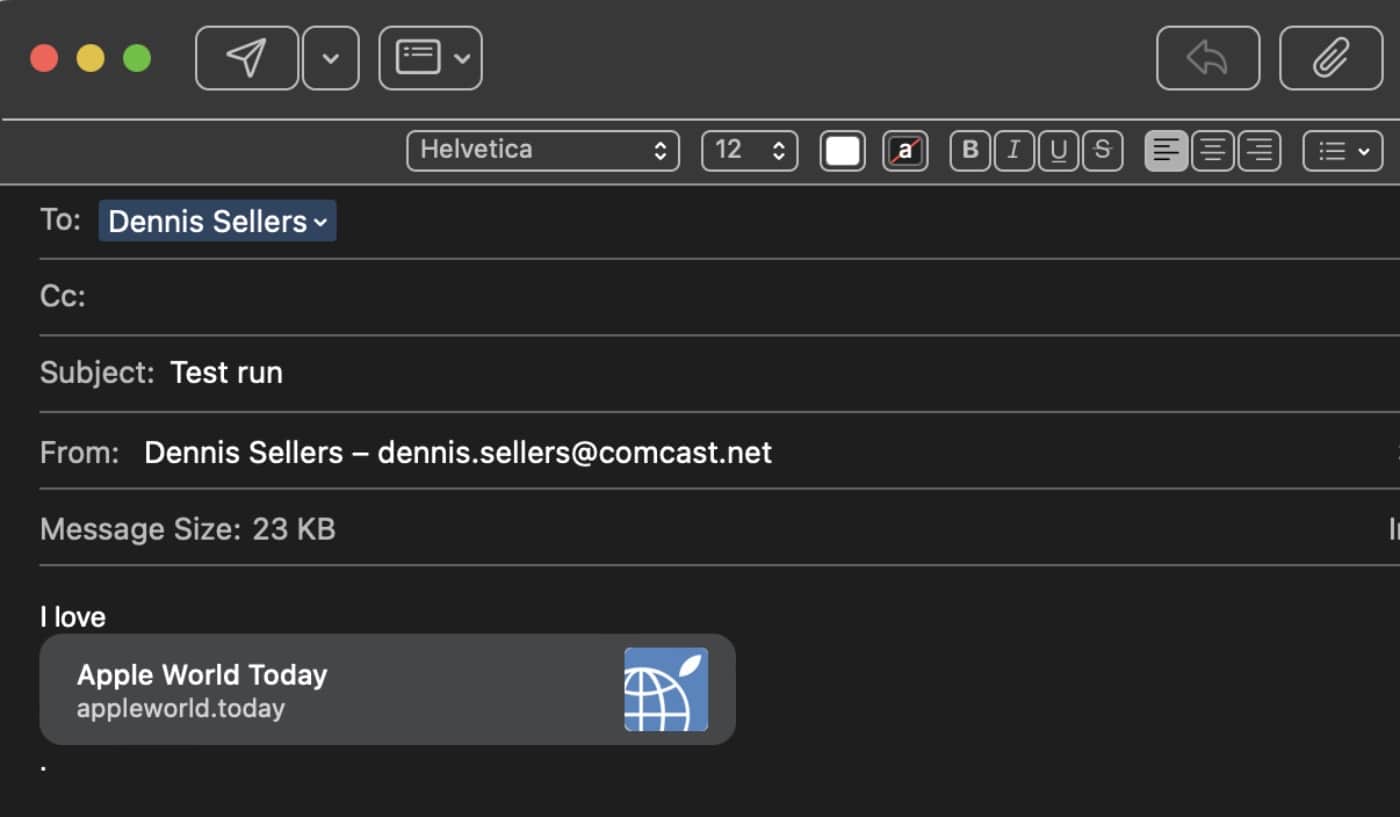
° Choose the Convert to Rich Link option by clicking on the down arrow next to the pasted link in the body of your email.
Missing recipients and attachments
With macOS Ventura’s Mail, you can get notified if you forget to include an important part of your message, like an attachment or a recipient. If you click the Send Mail button without including a recipient in a thread, Apple’s Mail app will prompt you to add them.
What’s more, if your mail indicates you are sending a file, but no documents or media were attached, the app will warn you about that as well. You can ignore the warning, or click on Don’t Send, attach the file and then send it.
Smart engine search corrections and suggestions
Apple says that intelligent search in macOS Mail improves your results by correcting typos and using synonyms for your search terms. Smart search now allows you to see a richer view of shared content and more as soon as you begin to search for email messages.

Mail’s search box now shows a list of the recent documents and links that were shared with you. The search results are displayed as you type like before. However, Mail now detects typos in your query, and lists items that match the correct spelling. It can also detect synonyms for the entered keywords to fetch the relevant emails.
BIMI support
Finally, macOS Ventura Mail can identify authenticated email messages with BIMI (Brand Indicators for Message Identification) verified brand iconography.
BIMI is an email spec designed to reward brands that properly authenticate their emails with the option to display brand logos in the customer’s inbox. According to the Postmark website, BIMI builds on top of DMARC, a powerful authentication standard that prevents spammers from using your domain to send email without your permission.
After you open an email that is verified with BIMI, the company’s logo will appear in the header section of the message. Once you click on the logo and expand the additional info, you’ll see a note from Apple explaining that the email is a digitally certified message and was verified to come from the indicated sender.




Alas, still no “Bounce” feature. Yes, I know, clever people can tell that the bounce was not real. But 99% of the time it worked perfectly to stop many annoying emails. That’s why I find myself still using OS 10.6.8. Bounce works perfectly there.
Unfortunately, the search in Mail now defaults to All Inboxes no matter which inbox or folder you were in at the time and so after the search you have to click back into the folder that you actually wanted to search in.
This wouldn’t be so bad if you were able to specify how you wanted the search to behave like you can in Outlook but, so far, there doesn’t seem to be an obvious way of doing this.